Table of Contents
Introduction
💻 HACKER We are now free to add code and logic to our program! However, if we are not too careful, our final program will quickly become spaghetti code full of fancy anti-patterns, bad code smells, and clever tricks that is a pain to deal with, potentially creating wasteful technical debt.
Let’s always remember: Just because something clever “works”, does not mean it is good, clear, maintainable, testable, or scalable.

Our little embedded system program will need a tried and true way of organizing our code and code execution flow, a software design pattern. Maybe some simple, predictable structure to orchestrate different device events such as button presses and LED patterns.
Enter the state machine! 🎰
The State Machine
A state machine is a programming behavior pattern (state) where your device can only be in one state at a time, transitioning between states when events happen. Generally, it flows like:
STATE --(event)--> STATE --(event)--> STATE ... etc
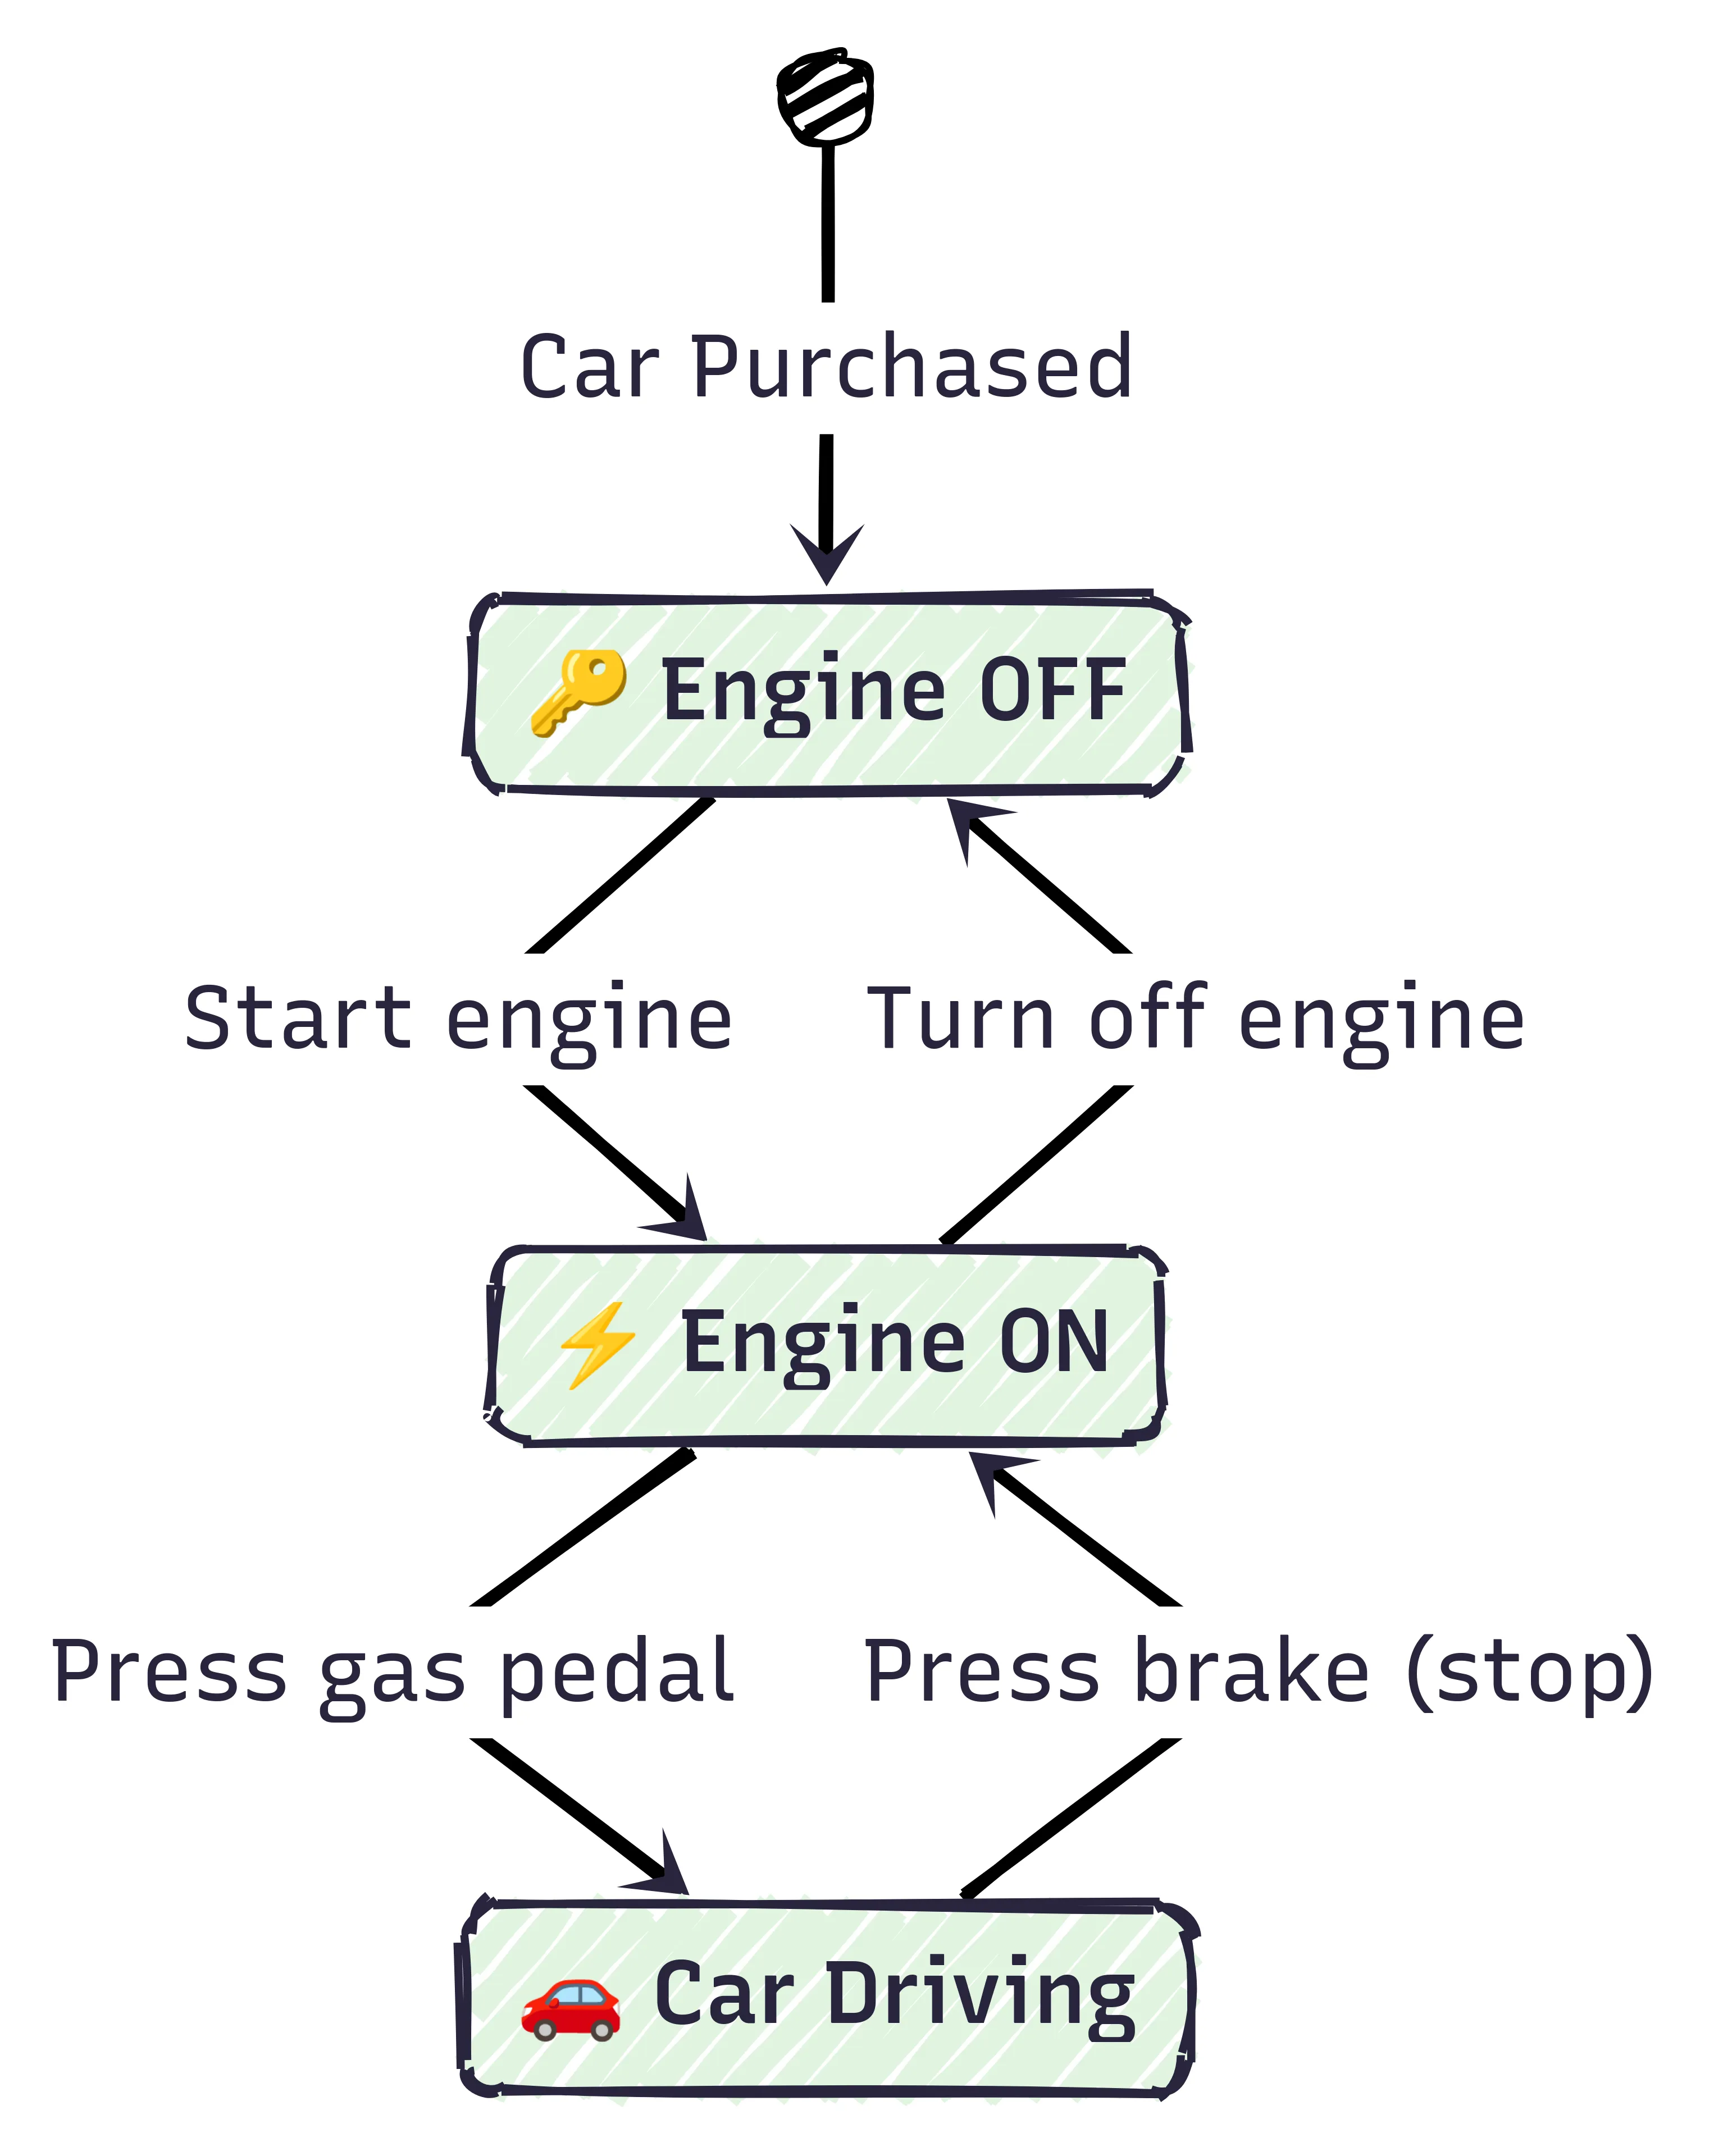
As an example, think of a simplified car. Initially, the car rests with the state of “engine off”. With the event of “start engine”, the car is in a state of “engine on”. You could then add an event of “press gas pedal” to have the car in a state of “car driving”.
Programmatically, state machines turn messy if-else statements into clear rules (i.e. “When engine is on and gas pedal is pressed, the car is driving.”). This makes bugs easier to find and features easier to add.
State machines are everywhere like washing machines (wash -> rinse -> spin), vending machines, or WiFi protocols.
More importantly to us, state machines are perfect for embedded systems. Our microcontrollers have limited memory and need fast, reliable responses. State machines use minimal fixed memory, guarantee quick event handling, and provide clear error recovery. When your button handles different press patterns while managing LEDs, a state machine keeps everything organized.
Event-Driven Finite State Machine
While there are a few different types of state machines, the specific state machine that we will be using for our project is technically an event-driven deterministic finite state machine.
That is, this state machine pattern will include the following:
- Event-driven - React to specific events like button presses, timeouts, or system conditions
- Deterministic - Each state + input/event combination has exactly one defined outcome (Mealy Machine)
- Finite states - Limited, well-defined set of states that the system can be in
- Single active state - The system can only be in one state at any given time
- Use a match/case pattern - Handle state transitions, matching current state and events to subsequent states
This approach gives us a clean, maintainable way to handle the complex interactions potentially between button presses, LED patterns, system states, and error conditions in our embedded device.
Now. Let’s dive into code!
File Changes
For a quick indicator of what files we will add or change in this part, expand the following file tree.
18 collapsed lines
.├── build.rs├── .cargo│ └── config.toml├── Cargo.lock├── Cargo.toml├── configs.json├── .gitignore├── memory.x├── README.md├── .rustfmt.toml├── rust-toolchain.toml├── secrets.json└── src ├── clocks_config.rs ├── main.rs # <--- Changes ├── state_machine.rs # <--- New └── utility.rssrc/state_machine.rs
To implement the finite state machine in our Rust code, let’s start by adding a new
src/state_machine.rs file and defining any states that this state machine
can be in with the State enum.
Also, let’s define all the events that can cause state changes with the Event enum.
//! State machine module for the embedded application
#![allow(dead_code)] // only used for development#![allow(unused_variables)] // only used for development
use defmt::*;use defmt_rtt as _;use panic_probe as _;
use embassy_time::{Duration, Instant, Timer};
/// State machine possible states#[derive(Format, Debug, Clone, Copy, PartialEq)]enum State { /// Startup - Initial state Startup, /// Device is idle Idle, /// Device is processing something Processing, /// Device is in an error state Error,}
/// State machine possible events#[derive(Format, Debug, Clone, Copy)]enum Event { /// Initial startup PowerOn, /// System ready Ready, /// Nothing has happened Nothing, // Temporary state machine event (To be replaced later) SomethingElse, /// Error has occurred Error,}So far so good.
Note that we are using the event of SomethingElse as a placeholder for
other events later in this project (i.e. button press?)
Now we are going to define a struct
to define the state machine’s behavior. That is, we will be outlining the skeleton of this
new StateMachine struct before filling in details.
// ....
struct StateMachine { /// Current state of the state machine: [`State`] current_state: State, /// Latest event: [`Event`] latest_event: Event,}
impl StateMachine { /// Constructor fn new(current_state: State, latest_event: Event) -> Self { StateMachine { current_state, latest_event, } }
/// Handle events and transition between states in state machine /// /// * `event` - Event to handle async fn handle_event(&mut self, event: Event) { // Check the current state of the state machine with the passed state machine event match (self.current_state, event) { // TODO: Logic to handle events
_ => {} } }
/// Get the current event - based on various conditions and inputs /// Return event to the state machine for determining the next state async fn get_current_event(&mut self) -> Event { // TODO:: Logic to get the next event }
/// Check for any system error conditions /// Return `true` if an error is detected async fn check_for_errors(&self) -> bool { false }}This is the very basic outline of the state machine with three methods that we will be working with.
Let’s take a moment to explain the above code outline for the state machine.
-
We are always storing the
current_stateand thelatest_eventof the state machine to (1) use it in logic and (2) keep it for any kind of reference, internal or external to this state machine -
At the very beginning of our program, we will define the initial
Stateand latestEventof the state machine innew(). -
handle_event()includes the logic that decides what state or event will happen next based on the current state and latest event. -
get_current_event()will potentially be included in a loop that continuously looks for the next state machine event.
Alright, let’s fill in some details, mainly defining how this state machine handles some events given current state.
// ....
struct StateMachine {4 collapsed lines
/// Current state of the state machine: [`State`] current_state: State, /// Latest event: [`Event`] latest_event: Event,}
impl StateMachine { /// Constructor fn new(current_state: State, latest_event: Event) -> Self {4 collapsed lines
StateMachine { current_state, latest_event, } }
/// Handle events and transition between states in state machine /// /// * `event` - Event to handle async fn handle_event(&mut self, event: Event) { // Check the current state of the state machine with the passed state machine event match (self.current_state, event) { (State::Startup, Event::PowerOn) => { info!("[State: Startup - Event: PowerOn]"); }
(State::Startup, Event::Ready) => { info!("[State: Startup - Event: Ready] Startup -> Idle"); self.current_state = State::Idle; }
(State::Idle, Event::SomethingElse) => { info!("[State: Idle - Event: SomethingElse] Some other event happened: Idle -> Processing"); self.current_state = State::Processing; }
(State::Processing, Event::Nothing) => { info!("[State: Processing - Event: Nothing] Nothing: Processing -> Idle"); self.current_state = State::Idle; }
(_, Event::Error) => { info!("[Event: Error] Error: {:?} -> Error", self.current_state); self.current_state = State::Error; }
(State::Error, _) => { core::panic!("[State: Error] State machine in an error state!"); }
_ => {} // No state change for unhandled events } }
/// Get the current event - based on various conditions and inputs /// Return event to the state machine for determining the next state async fn get_current_event(&mut self) -> Event { // ++ Add event handling here (i.e. monitor button press) ++
// No events occurred, return a nothing event Event::Nothing }
/// Check for any system error conditions /// Return `true` if an error is detected async fn check_for_errors(&self) -> bool { false }}Handling events happens in a match()
statement. Given the current Event and State, execute a specific logic and/or set the
next current_state of the state machine.
The final piece to this whole state machine puzzle here is actually creating the
state machine itself, setting its initial state and event, and starting one
continuous asynchronous loop.
// ....
/// State machine task with infinite loop#[embassy_executor::task]pub async fn state_machine_task() -> ! { info!("Running State Machine async task ...");
let mut state_machine = StateMachine::new(State::Startup, Event::Nothing); state_machine.handle_event(Event::PowerOn).await;
// Main infinite loop for the state machine loop { // Get the current event let current_event = state_machine.get_current_event().await;
// Handle the event and update the state state_machine.handle_event(current_event).await;
// Add a small delay to prevent tight looping Timer::after_millis(10).await; }}In this continuous loop we are repeatedly checking and fetching a new event, handling the event, and waiting a tiny bit.
That is it for now! Remember, we will keep coming back to this state machine definition to add states, events, and logic for features to come.
src/main.rs
This will obviously have to be somehow tied back into our main program. With our implementation of the state machine this should be relatively easy.
All we are going to do is add the state_machine module and spawn the asynchronous task
we created.
13 collapsed lines
#![no_std]#![no_main]#![allow(unused_variables)] // only used for development#![allow(unused_imports)] // only used for development
use defmt::*;use defmt_rtt as _;use panic_probe as _;
use embassy_executor::Spawner;use embassy_rp::config::Config as HalConfig;use embassy_rp::gpio;use embassy_time::Timer;
mod clocks_config;use clocks_config::ClockSettings;mod state_machine;mod utility;
9 collapsed lines
// Loading configurations// Note: This comes from the 'configs.rs' file created in 'build.rs' from 'configs.json'// Note: All loaded configurations will be UPPERCASE string slice (&str) constantsinclude!(concat!(env!("OUT_DIR"), "/configs.rs"));
// Loading obfuscated secrets (XOR_KEY and _OBFUSCATED constants)// Note: Similar considerations as configurations// Note: Load via utility.deobfuscate()include!(concat!(env!("OUT_DIR"), "/secrets.rs"));
#[embassy_executor::main]async fn main(spawner: Spawner) {18 collapsed lines
info!("=================================="); info!(" Package: {} v{}", env!("CARGO_PKG_NAME"), env!("CARGO_PKG_VERSION")); info!("==================================");
// Apply default clock configuration let mut hal_configuration = HalConfig::default();
info!("Configuring all system clocks ..."); let clock_settings = ClockSettings { xosc_crystal_hz: 12_000_000, // RP2350 uses 12MHz crystal system_frequency_mhz: CLOCK_SYSTEM_FREQUENCY_MHZ.parse::<u32>().unwrap(), usb_frequency_mhz: CLOCK_USB_FREQUENCY_MHZ.parse::<u32>().unwrap(), peripheral_clock_divider: CLOCK_PERIPHERAL_DIVIDER.parse::<u8>().unwrap(), adc_frequency_mhz: CLOCK_ADC_FREQUENCY_MHZ.parse::<u32>().unwrap(), reference_clock_divider: CLOCK_REFERENCE_DIVIDER.parse::<u8>().unwrap(), }; clocks_config::configure_all_clocks(&mut hal_configuration, clock_settings); let peripherals = embassy_rp::init(hal_configuration);
// Log and verify system clock frequencies clocks_config::print_device_frequencies(); clocks_config::verify_clock_with_timer(500).await;
// Spawn state machine async task spawner .spawn(state_machine::state_machine_task()) .expect("Failed spawning state machine");
info!("All Set! Running async loop ...");
// General async loop to ensure entire program runs forever while // asynchronously working on other tasks loop { Timer::after_secs(5).await; }}Fire it up!
Ensure our Raspberry Pi Pico 2 W and its debug probe are plugged in, connected correctly,
and recognized by your computer. Then run the ol’ cargo command.
cargo run --releaseThe terminal output should look like this:
Compiling big-button v0.1.0 (/home/you/projects/big-button) Finished `release` profile [optimized + debuginfo] target(s) in 0.98s Running `probe-rs run --chip=RP235x --log-format '[{t}] {[{L}]%dimmed%bold} {{f:dimmed}:{l:dimmed}%30}: {s}' target/thumbv8m.main-none-eabihf/release/big-button` Erasing ✔ 100% [####################] 16.00 KiB @ 58.98 KiB/s (took 0s) Programming ✔ 100% [####################] 16.00 KiB @ 31.72 KiB/s (took 1s) Finished in 0.78s[0.000509] [INFO ] main.rs:32 : ==================================[0.000539] [INFO ] main.rs:33 : Package: big-button v0.1.0[0.000591] [INFO ] main.rs:34 : ==================================[0.000608] [INFO ] main.rs:39 : Configuring all system clocks .......[0.500946] [INFO ] state_machine.rs:65 : [State: Startup - Event: PowerOn]That was … anticlimactic 😞 … But we know that our state machine structure is in place and actively working in the background without any issues. Again, in the upcoming project steps we will add more things to this state machine.
Cool. If everything is good, git commit your changes and push to GitHub.com.
Ok what’s next?! Let’s check it out!
No spam. Unsubscribe any time.